
Have you noticed search results with star ratings, images, or FAQs? These attention-grabbing features often appear thanks to schema markup. It’s a tool that helps search engines understand your content better and display richer results.
Why should you care? Schema markup can help your blog posts stand out, attract more attention, and even perform better in voice search. In this guide, I’ll show you how to write schema markup step by step so you can make your content more search-friendly today.
Table of Contents
What is schema markup?
Schema markup is a way to help search engines understand your website’s content. Instead of guessing what your page is about, search engines can rely on schema to understand specific details. For example, it can differentiate between a “recipe” and a “restaurant” or highlight an article’s publication date and author.
By adding schema, you’re essentially labeling your content so search engines can organize it better. This can result in more detailed and attractive search results, like star ratings, FAQs, or even images appearing alongside your page link.
Schema markup is written using formats like JSON-LD (recommended), Microdata, or RDFa. These formats are supported by Schema.org, which provides a universal vocabulary for structured data.
Here’s what schema markup can do for you:
- Improve search engine understanding: It tells search engines exactly what your content represents – whether it’s a product, an event, or an article.
- Unlock rich search results: Your page could feature special elements like reviews, recipes, or event details.
- Boost engagement: More eye-catching results can make your link stand out and attract clicks.
- Support voice search: It helps voice assistants find precise answers from your website.
Key elements of schema markup
Schema markup is built on a few core components that work together to structure your data. Here’s a breakdown:
- @context: This tells search engines which vocabulary you’re using, usually Schema.org. Think of it as the foundation of your schema – it sets the rules for how everything else connects.
- @type: Specifies the type of content you’re describing. For example, you might label a blog post as “BlogPosting” or an event as “Event.”
"@type": "BlogPosting"- Properties: These define the attributes of your content. They’re like filling in the details of a form – providing a title, description, or even an image.
- Entities: These are the “things” your schema describes, like a product, article, or person. Each entity becomes the focal point of your markup.
- Data relationships: Schema links entities and their properties, creating a structured web of information. For instance, a “BlogPosting” can connect to its author or publisher.
- Namespace – the vocabulary or source for the schema, typically Schema.org.
- Optional elements: Add depth to your schema with elements like sameAs (social media links) or inLanguage (content language).
A quick lesson learned:
When I first worked with schema, I found that properties like name and description were essential for validation. Leaving them out resulted in errors during testing. Including even the optional elements, like sameAs, helped enrich the schema and provided more context for search engines.
How schema markup works

Schema markup operates behind the scenes, giving search engines a clear structure to interpret your content. Here’s a closer look at the process:
- Add schema code: The schema is added directly to your webpage, usually in JSON-LD format. It provides specific details, like identifying an image or defining a blog post, without disrupting your page layout.
- Search engines parse it: When search engines crawl your page, they process the schema markup to understand the content’s purpose and connections. For instance, they’ll recognize that a “BlogPosting” schema refers to an article and link it with its author or publication date.
- Enhanced search results: With schema in place, search engines can display extra details in search results, such as thumbnails, publication dates, or ratings, making your page stand out visually.
When adding schema to a blog, I always make sure to test it first using tools like Schema Validator. This step helps me catch potential errors early and prevents unnecessary warnings in Google Search Console.
Types of schema markup
Schema markup isn’t one-size-fits-all. There are different types designed to suit various kinds of content. Some of the most common ones include:
- Website: This schema provides information about your entire website, such as its name, description, and the primary purpose. It’s often used on the homepage to establish a site-wide identity.
- WebPage: This schema focuses on individual web pages, specifying their purpose and type (e.g., FAQ, About, Contact). It’s especially useful for clarifying the function of pages within your website. For example, adding WebPage schema to an About page to define its purpose.
- BlogPosting: Ideal for blog posts and articles, this schema highlights details like the title, author, and publish date. It can also link to an image or the publisher’s name. For example, if you run a blog, this schema helps search engines display key information directly in search results.
- Product: Perfect for e-commerce, the Product schema showcases product details like price, brand, and availability. Adding this type can also enable features like star ratings. For example, a listing for a smartphone might include the product’s name, price, and customer ratings.
- Organization: Used to describe a company or organization, this schema includes details like the name, logo, contact information, and social media links. It’s critical for establishing credibility and is usually implemented site-wide.
- LocalBusiness: For physical locations, this schema includes address, phone number, hours, and reviews. For example, a gym uses schema markup to show its hours and customer ratings.
- FAQPage: Designed for pages with a question-and-answer format, this schema lets search engines display FAQs as expandable questions directly in search results. For example, a fitness blog answering common workout questions could use FAQ schema to highlight those answers.
- Event: Use this schema to describe events, such as webinars, workshops, or fitness classes. For example, an event organizer might use this schema to ensure their event stands out in search results with dates and ticket info.
Choosing the right schema
Start with foundational types like Website, Organization, and WebPage to build a strong base. Then, expand with content-specific schemas like BlogPosting, Product, or FAQPage depending on your website’s focus.
How to write schema markup code
Writing schema markup might seem technical at first, but with a step-by-step approach, it’s easier than you think. Here’s how to get started:
1. Understand the basic structure
Schema markup is often written in JSON-LD (JavaScript Object Notation for Linked Data). This format organizes your data in a clean, readable structure that search engines prefer. The basic syntax looks like this:
<script type="application/ld+json">
{
  "@context": "https://schema.org",
  "@type": "TypeHere",
  "property": "value"
}
</script>
2. Select the right schema type
Start by selecting a schema type that matches your content. Here are some common types but you should visit Schema.org for a complete list:
- BlogPosting: For blog posts and articles.
- LocalBusiness: For businesses with physical locations.
- Products: For e-commerce product pages.
- FAQPage: For question-and-answer formats.
Begin with one type to avoid overwhelming yourself. If you’re marking up a blog post, start with BlogPosting before experimenting with others.
3. Start writing the code
Once you’ve chosen a type, start writing the code. Begin with the < script > tag:
<script type="application/ld+json">Add the @context and @type:
{
  "@context": "https://schema.org",
  "@type": "BlogPosting",
}
4. Add key properties
Now, it’s time to include some essential properties. Each schema type has specific required fields, so be sure to cover the basics. For example, a BlogPosting schema might include:
- headline: the title of your blog post.
- author: the person or organization that wrote it.
- datePublished: when the post was published.
Optional properties like keywords can enhance your schema but aren’t mandatory.
<script type="application/ld+json">
{
  "@context": "https://schema.org",
  "@type": "BlogPosting",
  "headline": "How to Write Schema Markup",
  "author": {
    "@type": "Person",
    "name": "John Doe"
  },
  "datePublished": "2024-12-01"
}
</script>
Overall, think of this as filling out a form where each field provides specific details about your content.
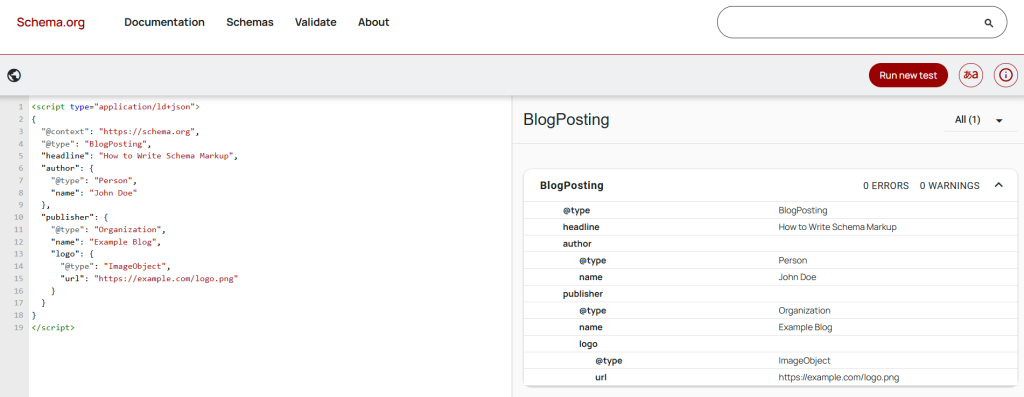
5. Use nesting for complex data
Some content requires nested schemas to show relationships between entities. For instance, a blog post might include details about the author, publisher, or featured image. Here’s an example where the Publisher is nested within the BlogPosting schema to provide more detailed information.
<script type="application/ld+json">
{
  "@context": "https://schema.org",
  "@type": "BlogPosting",
  "headline": "How to Write Schema Markup",
  "author": {
    "@type": "Person",
    "name": "John Doe"
  },
  "publisher": {
    "@type": "Organization",
    "name": "Example Blog",
    "logo": {
      "@type": "ImageObject",
      "url": "https://example.com/logo.png"
    }
  }
}
</script>
6. Validate your code
Before publishing, always validate your schema to ensure it’s error-free. You can test your code with Schema.org’s Markup Validator. It checks for:
- Syntax errors.
- Missing or required properties.
- Compatibility with structured data standards.
Simply paste your schema code into the tool, and it will highlight any issues along with suggestions for fixes. This step is critical to ensure your schema is error-free before adding it to your website.
7. Add the script to your website
Embed your schema in the < head > or < body > of your webpage. For CMS platforms like WordPress, you can use plugins like Rank Math or Yoast SEO to simplify the process.
8. Revalidate your code
After publishing, revalidate your live page to confirm everything works and your schema is accurate, functional, and ready to enhance your search presence.
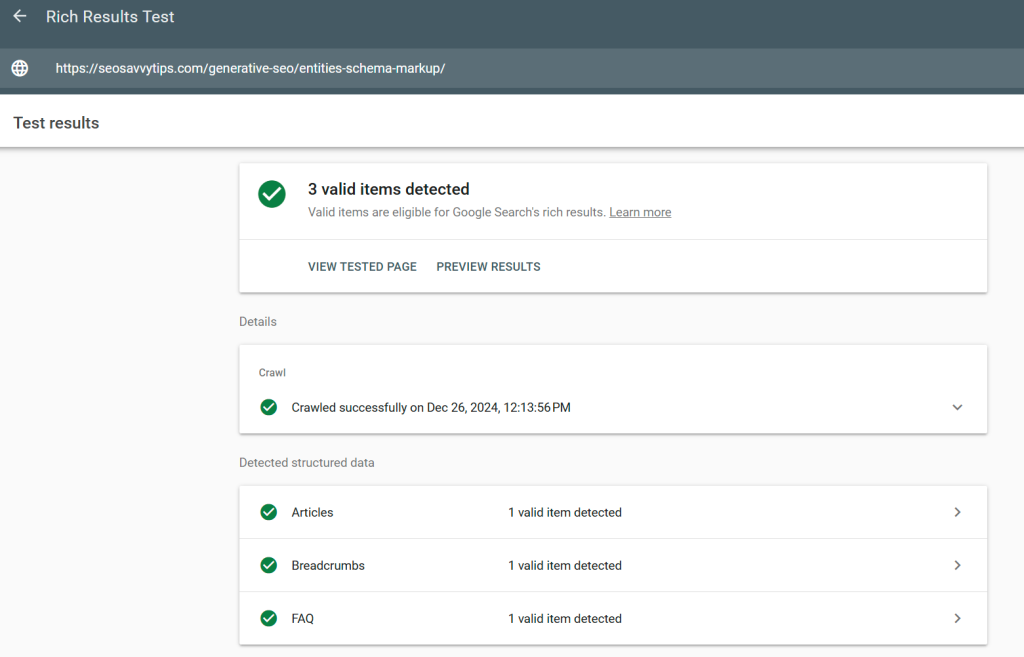
Validate live pages with Google’s Rich Results test
Once your schema markup is implemented, test the live URL with Google’s Rich Results Test to verify its eligibility for rich search features.
- Paste your page’s URL into the tool to check for rich result readiness.
- Review the output to confirm if your schema qualifies for enhancements like FAQs, star ratings, or event details.
- Resolve any flagged errors so the schema functions correctly.
Here’s a tip: Use this tool for schemas designed to trigger visual search enhancements, such as FAQPage or Product.

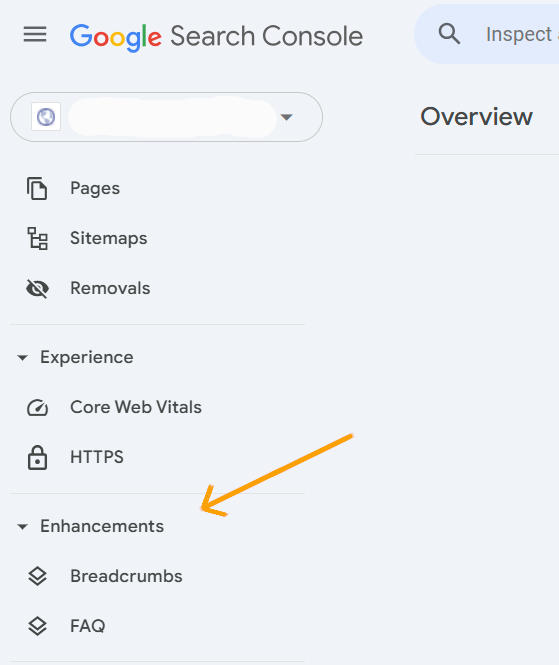
Monitor Google Search Console
After implementation, regularly check Google Search Console for structured data reports.
- Navigate to the “Enhancements” section to review any flagged issues.
- Address errors promptly, as unresolved issues might prevent your schema from being displayed in search results.
By following these steps, you’ll be able to create effective schema markup that enhances your website’s visibility while avoiding common errors. Don’t forget to practice with different schema types to get comfortable. Try Product, Event, SoftwareApplication, or LocalBusiness schemas to expand your skills.
Key points to be careful about
While schema markup can enhance your website’s search visibility, it needs to be implemented thoughtfully. Here are some critical points to keep in mind.
Correctly choose and use schema types
Some schema types, like Organization, should only be used once across your entire website. This is because they act as global identifiers for your business. Using them multiple times on your website can confuse search engines and dilute their purpose.
It’s best to implement the Organization schema on your homepage and use it to define your business details, such as name, logo, and URL.
{
  "@context": "https://schema.org",
  "@type": "Organization",
  "name": "Example Company",
  "logo": "https://example.com/logo.png",
  "url": "https://example.com"
}
Specificity over generalization
Always use the most specific schema type available for your content. This improves accuracy and relevance in search results. For example:
- Use NewsArticle instead of Article if the content is news-related.
- Use LocalBusiness instead of Organization for a physical location.
What happens if this rule is ignored? Search engines might skip your structured data or fail to display rich results.
Avoid missing required properties
Every schema type has required fields. Leaving these out can result in errors and disqualify your schema from appearing in search results. For instance, in a Product schema, always include name, description, and offers (e.g., price and currency).
{
  "@context": "https://schema.org",
  "@type": "Product",
  "name": "Smartphone X",
  "description": "A smartphone with advanced features.",
  "offers": {
    "@type": "Offer",
    "price": "699.99",
    "priceCurrency": "USD"
  }
}
Avoid duplicating or overlapping schema
Stick to one instance of a schema type per page. Duplicates can confuse search engines and lead to errors. So, if you need to describe multiple items, use a single schema object with nested elements.
Correct:
{
  "@context": "https://schema.org",
  "@type": "Product",
  "name": "Smartphone X",
  "description": "A smartphone with advanced features.",
  "brand": {
    "@type": "Brand",
    "name": "TechBrand"
  }
}
Incorrect: Adding separate Product schemas for two items on the same page.
<script type="application/ld+json">
{
  "@context": "https://schema.org",
  "@type": "Product",
  "name": "Smartphone X"
}
</script>
<script type="application/ld+json">
{
  "@context": "https://schema.org",
  "@type": "Product",
  "name": "Smartphone Y"
}
</script>
Use accurate and consistent data
The data in your schema must match the visible content on your page. Never include information that doesn’t actually appear on the page. For example, if your product price is $699.99 on the page, ensure the price property in your Product schema is also $699.99. And don’t add reviews or offers if your page doesn’t display them.
Also, keep branding consistent. For Organization or LocalBusiness, ensure the business name, logo, and address match your website and Google My Business profile. Otherwise, Google may penalize your website for “misleading” structured data.
Don’t overload a page with multiple schemas
Don’t add every possible schema to a single page. Instead, focus on the most relevant type. For example, a blog post doesn’t need a Product or Event schema unless it explicitly includes those elements.
The presence of excess schema may confuse search engines and dilute the effectiveness of your primary schema.
Handle nested objects carefully
Nested schemas require precise formatting to ensure relationships are clear. Always validate your nesting syntax. For example, here’s how to nest Review in a Product schema:
{
  "@context": "https://schema.org",
  "@type": "Product",
  "name": "Smartphone X",
  "review": {
    "@type": "Review",
    "author": "Jane Smith",
    "reviewRating": {
      "@type": "Rating",
      "ratingValue": "4.5",
      "bestRating": "5"
    },
    "reviewBody": "This smartphone is fantastic!"
  }
}
Errors in nesting can break the schema and lead to validation failures.
In summary
Think of schema markup as a way to give your website an edge in search results. By structuring your content with precision, you help search engines display it in more engaging and informative ways.
Start small by focusing on one schema type that aligns with your content goals. Validate your code before implementation to avoid errors, and use tools like Google Search Console to monitor your progress. Remember, even small improvements can make a noticeable difference in how your website appears in search results.
FAQs
Not really! Search engines care more about the accuracy and relevance of your schema markup properties than the order they’re listed in.
Technically, there’s no strict character limit for Schema markup. However, excessively long markup can create practical problems, such as increased page size, parsing difficulties, and maintainability issues, that affect your website’s performance and SEO.
No, you should not use the Organization schema on all pages of your website. It’s intended to describe your organization as a whole and is best suited for the homepage or a dedicated “About Us” page. If you need to connect content to your organization, use the publisher property within other schema types (like BlogPosting or Product) to reference your Organization schema.
No, you shouldn’t use the Person schema type on all your blog posts or pages. This schema is meant to describe a person, not the content of a blog post. Using it incorrectly could confuse search engines and hurt your website’s SEO. Use Person schema to describe yourself on pages that specifically focus on you. These are typically your “About Me” page or an author bio.
No, using WebSite, WebPage, and BlogPosting together on every blog post is generally not recommended. Each type serves a specific purpose, and misusing them can create redundancy or even confusion for search engines.
Site Navigation schema, also called BreadcrumbList schema, helps search engines understand your website’s navigation structure and hierarchy. You typically use it to mark up breadcrumbs, which display a user’s current location on your website (e.g., Home > Blog > Category > Post Title).
Hentry is an older microformat used to add semantic HTML to blog posts or articles. Its purpose was to help machines, like search engines, better understand the content on a webpage. Hentry was useful in the past, but Schema.org has largely replaced it with more comprehensive and modern structured data options that search engines prefer. Key takeway: skip Hentry, adopt Schema.org.